Before you start with the very first step to improve SEO and increase the visibility of your website, you need to sign up for Google search console which was earlier known as Google Webmaster Tools. There are a variety of features here that could help you stay in line with Google’s Guidelines. You’ll get a bird’s eye view of the whole website. If you’ve remained the virgin to the concept of this incredible analytics tool, we’ve got a beginner article for you. Read on.
What is Google search console?
It is a free resource by Google that helps you understand what is actually going on with your website. Such is the richness of the tool, that it has easily become a valuable information center for everyone. It is not just for the consumption of a website owner. Be it marketing professionals, web designers or app developers, all of which can use the data provided by the search console to take better decisions. Due to this ever inclusive nature of the tool, the earlier name ‘Google Webmaster Tools’ was changed in May 2015.
Being an absolutely free service that offers information about your website, you can easily find out stats like number of visitors (from search), the actual source of traffic, popularity of certain pages on your website, and so on..
Google search console is also a helpful tool to fix certain technical problems on your website. You can submit a sitemap, set crawler settings, check out the Robots.txt file and much more. When linked with Google analytics tool, the combination becomes invincible.
While it is very difficult to touch upon all of them in a single post, let’s take a quick look into the basics of the search console. If you’re quite new to the tool and you’ve not yet begin exploring it, this is the time.
Add and verify your site
The first thing that you need to do is to add and verify your site in Google search console. This is a step that proves that you are either a site owner or an authorized user that can use the detailed information and insight about the website’s performance. Quite naturally, Google is not interested to share that kind of information to anybody. That is precisely the reason it is a multilayered process to avoid any security attack.
When you done logging into your search console account, you’ll see a box next to the red button which reads “Add Property”.
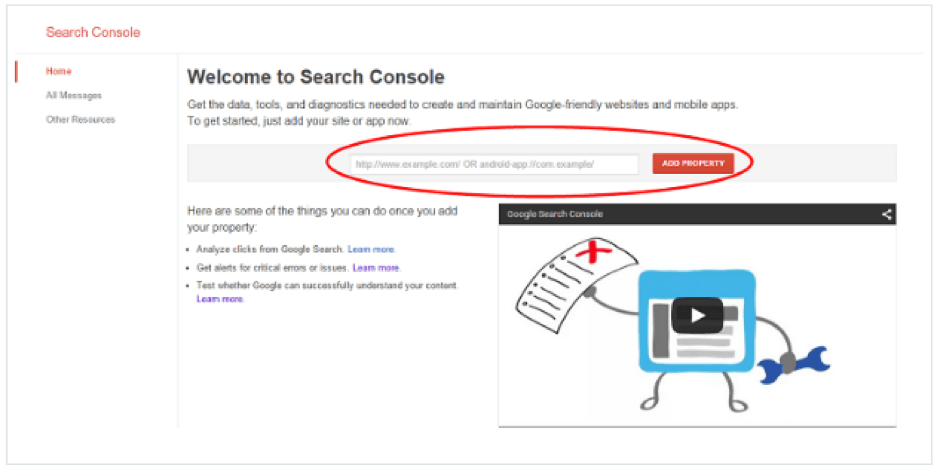
Enter the URL in the box and click the button right next to it. In the next step, you will be asked to verify your own site. There are number of methods that you can use here. You could easily upload a file to your website or work with a HTML code. In fact, the best part here is that you have array of options to choose from. It all depends upon your comfort level.
All of this is a very simple procedure and I’m sure once you start with it you would not face any kind of problem. If you do, there are tons of tutorials available across the internet to help you out.
Let’s move on to the next step.
Link Google analytics with Google search console
Let’s understand the difference between the two first. They sound similar, yet serve a completely different function.
Google analytics gives you data points about the number of visitors you get in, what is the source, where exactly are they coming from, how much time they spend on your site, and what’s the nature of these visitors.
Search console, on the other hand, will reflect about information which is specific to your site. For example, who all are linking to you, if there is any technical error or virus on your website. Google search console will also let you know about the keyword queries that lead up to your website on search engines.
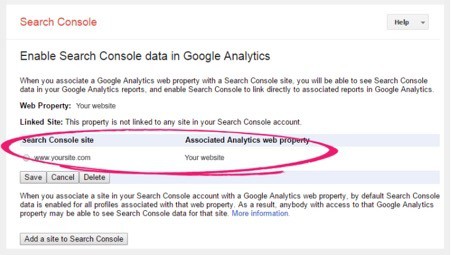
The best thing here is to link both of these tools together. This is that one step that will help you get the most out of your search console and your site analytics.
Adding a Sitemap and checking the Robots.txt file
You must have heard a lot about how sitemaps work and it’s the most important piece of information that you can offer to a search engine bot. All of that is true. A sitemap is kind of a route-map for your website. When a web crawler visits your website the sitemap directs the crawler through each and every corner of your website.
By adding a site map, you’re making Google’s job easier by ensuring that they have all the right information about your website. This is especially important for new sites, when Google is totally unaware of your existence. In a way, it becomes a classical invitation for the search engine to visit your website and rank it properly.

You could easily click on crawl, then on sitemaps and follow the easy procedure.
Once you’re done with submitting a sitemap, there is another important feature that you need to take care of. It’s the Robots.txt file.
If you are an experienced website owner, it’s not difficult to understand that you don’t want all pages of the website to be indexed by search engines. There are certain things that you really don’t want search engines to find out or you don’t want to put extra emphasis on.
That’s where a Robots.txt file comes into the picture.
Very important to ensure that you present the best version of your website to the search engines and stop the web crawler from visiting something which is useless. The commands in this file are sort of instructions for the web crawlers to avoid certain portions of the website and not crawl it. Let’s not forget; it’s not a foolproof method and some crawlers would still visit the pages you don’t want them to go to. Yet, it works well in most cases. Something you can’t ignore.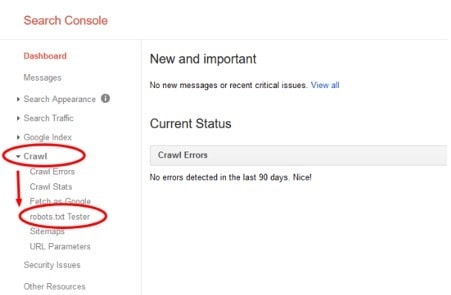
Again, you can click on crawl and then move on to the robots.txt tester. It is not very difficult to update it yourself. However, it is recommended for new users to get in touch with someone experienced on this. Before submitting the final version of the robots.txt file, it’s important to test your website for optimum performance. Check whether everything is working fine. If it’s not done correctly, re-upload the new robots.txt file to your site and try one more time.
Note: if you’re facing some errors or not sure about the process, work with an experienced webmaster on this.
Capabilities of Google search console
These were some of the basic steps for an absolute beginner. Now you might have questions regarding the usage of the Google search console. Let’s quickly take a look at the dashboard, to know what exactly you can find here.
Check out the important stats
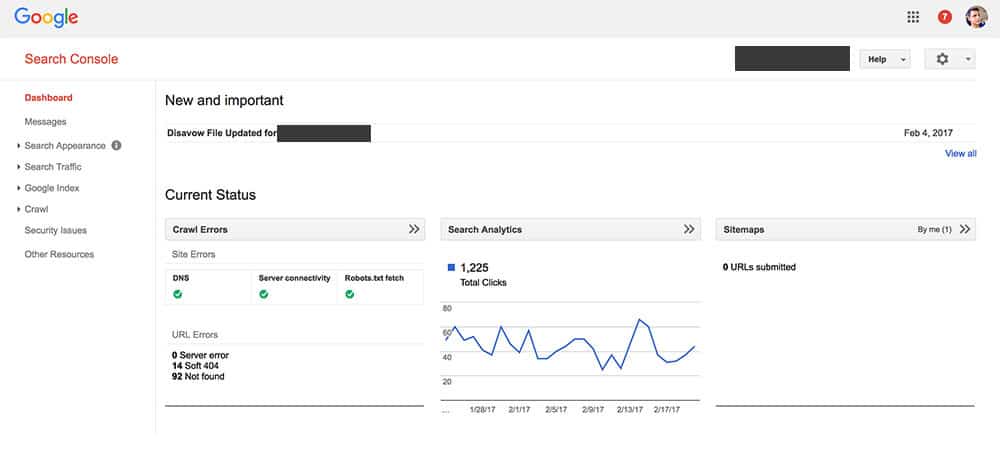
As you can see, you get important information about the search appearance, traffic, crawl status and major security issues, all at one place.
Monitor overall performance
Nothing comes for free and you need to know whether all the resources that you put into advanced SEO practices are actually giving you any returns.
That’s where you can easily monitor the performance of your website. Google search console will give you all the information about the internal working of your website. Everything that a Google Webmaster (even a non-technical one), needs to know.
You can check everything about crawl activity and related errors. It will give you a glance into the URL errors across different devices.
Track HTML improvements
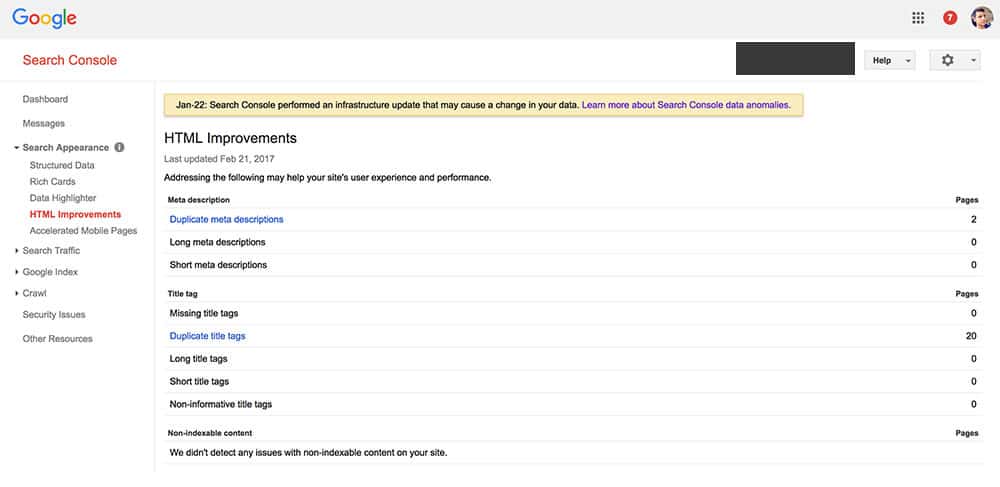
You can easily use HTML improvements tab to make your website more efficient. As you can see here, it’s easy to sort out duplicate meta-descriptions and title tags right away.
Measure campaign successes
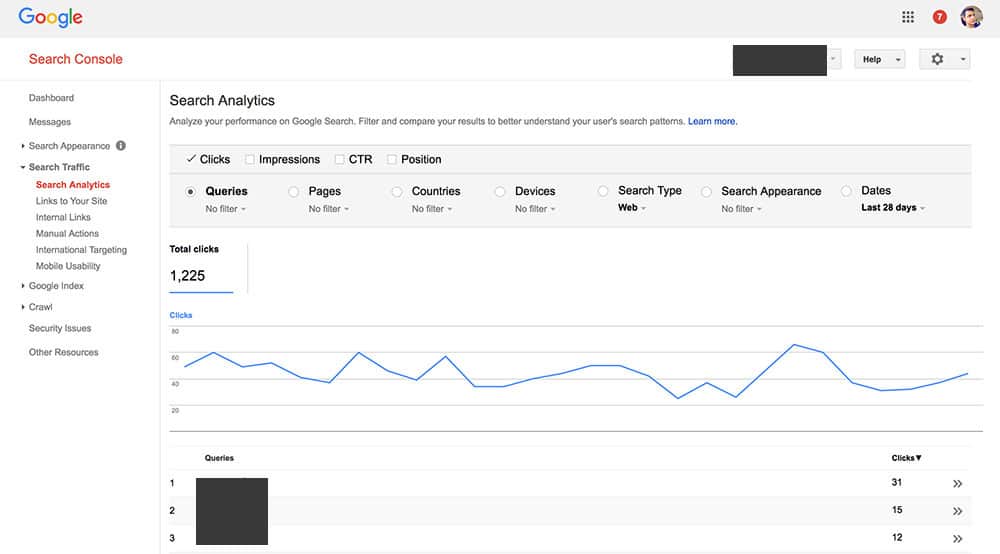
As mentioned before, the most important feature that Google search console offers is measuring your SEO campaign success. You can see an ocean of information under the search analytics tab. You could measure click, impressions, the search positions and every other important data set that you can think of. You can also understand the popular search queries that lead to your website. It’s not difficult to figure out the quality and number of links and also the kind of content that gets the best response on your website.
Check for Errors
If your site is giving a lot of 404 or 500 Errors, Google Search Console will tell you about it. And as a webmaster, you should immediately fix all those issues. Because so many errors on a site have a negative impact on SEO.
Set a Preferred Site URL
You can tell google what your preferred site url is, with or without www. And its important to do so, we don’t want duplicates in search results. But before you pick a default url, you need to add and verify both versions of your website.
That’s some powerful stuff there. All in all, it will help you develop a more successful search strategy and make your site more profitable.
Conclusion
With this we come to an end of a quick overview about Google search console. Really hope this guide has been helpful in introducing you to the powerful potential of this amazing tool. Now you can start analyzing each piece of information that you view on your console and create the best possible experience for your visitors.
Let’s get to work. All the best.
[su_button url=”https://rohitink.com/wordpress-seo/tips-tricks-seo-friendly/” background=”#3c6983″ color=”#ffffff” size=”5″ center=”yes” icon=”icon: arrow-right”]Proceed to Chatper 5: Tips & Tricks[/su_button]
[su_button url=”https://rohitink.com/wordpress-seo#primary” background=”#413c83″ color=”#ffffff” size=”5″ center=”yes” icon=”icon: list-ul”]View All Chapters[/su_button]